Saturday, December 5, 2015

Quick optics 101

Here's a quick fun thing to do with a telescope on a rainy day.

Try this:
- point your telescope at something bright
- remove the eyepiece and place a piece of cardboard where it should be. Move the cardboard back and forth and you'll resolve an image!


Scroll over to 30 seconds or so to see the end result.

How does it work? We know from simple optics that if you have an image a distance d0 away, that another object will appear d1 away:


where f is the focal length of your telescope. Here is a schematic of the setup. The object is labeled "O" and the image "I".

Analyzing my setup, we see that d0 = 2.5m, and f is 700mm. This means with some algebra that we should expect an image at d1 = 1.03 m.
The object is at S1 and the image at S2+S3

What happens with images from the sky?


Images from the sky are actually located so far away that d0 is very large, and as a consequence 1/d0 goes away. This means then that:
1/d1 = 1/f

So if you did the same thing with the moon, you could use it to find the focal length of your mirror!


Saturday, November 21, 2015

Using a webcam to image the moon

I'll try to make this as brief as possible, in hopes the images describe the process. I basically did this in one evening (20 min to make the focuser, and then 30 min to get the imaging set up. Clouds came in so I had to postpone for now).


The goal of this project is to revive an old webcam and an old telescope to take some images of the night sky. I have many ideas in mind that will stem from this.

Step 1: Find your image


Simple optics will tell you that an image coming from very very far away will resolve as an image in plane at the focal length of the optics assembly.

The location of the image plane is important as when imaging, this is where you want to place your 2D detector (i.e. CCD chip from a webcam).


Here is an example of the process. I removed the eyepiece from my Tasco Newtonian (700mm focal length), pointed it at the moon and stuck a piece of cardboard near where I knew the image plane to be located. At the image plane, you will see a very sharp image of the moon. This is where your CCD chip should be.


The bright light on the piece of cardboard is an image of the moon resolved in plane at the focal length.


Some small detail: you'll also want to double check that the image being resolved is well centered coming out of the focus. If it's not, then adjust your secondary mirror. Note: if you're not sure, don't touch the secondary mirror. Often this piece does not need to be aligned and if you bring it out of alignment, it can be frustrating to bring back (it has 3 degrees of freedom, and is often a delicate effort to adjust the screws that control its orientation).

Step 2: Make the focuser


I haven't received my focuser yet, so I decided to concoct something out of regular household materials. Picture will say all...


The makeshift focuser. I cut and shorten the diameter of one tube so it can slide in the other. I add tape to add more friction. It works quite nicely.

Step 3: Mount the webcam, point and measure!


The scope mounted, connected to pc. I use cheese (free open source) for the image capture.


The end result

Since we know we see just brightness and darkness on the moon (grayscale), not color, we can sum the colors together. Here is the image again in grayscale. Unfortunately, it's saturated. Will have to attenuate the image next time.


Grayscale version of the end result.

After thoughts


Why is the moon pink?


When I use the webcam with the lens, I don't see pinkish colors. When I use it without the lens (for the telescope), I do see the pink colors. The conclusion must be that the lens must also be filtering out red light. This also suggests that the webcam's red is more sensitive than it should be. Will check this out later.


If you see a photo of the lens below, you see that it reflects red.


The webcam on a toilet paper tube.

Time lapse evening log

Finally, here's proof of the non-astro friendly weather tonight :-( :-(
(Cleardarksky.com was much more optimistic than the end result this time)


Time lapse at Custer institute. We waited 2 hours, no signs of clearing.


Sunday, July 19, 2015

Weather Data - Part II : The reader

So how do we extract cloud data? One method is simply by observation. However, why observe when we have the satellites to help us.

The data

The data can be found here although I currently see that the server is down (hopefully this will change soon). 

The data format

The data format is sort of summarized in this document here.

The reader

The reader written in C can be found here. However, beware, this code only works for a big endian machine. For little endian, make this substitution:
data.Preptr->npix becomes ntohl(data.Preptr->npix)


The reader (Python version)

At a recent hackathon in Montreal, I took the liberty to rewrite the library in python just to help with the visibility of this data, and also well, learn python.
Here is the source.

I would like to point out that there is also a java version written by Andre Mas here. We wrote the library in parallel just to challenge ourselves and better understand this data at a lower level.

Anyway, so what's the result?
Here is a quick result on the infrared radiance.

data set: ISCCP.DX.0.GOE-7.1991.01.01.0000 the infrared radiance measured.
Why did I choose the radiance? Because infrared is visible during the day or night. (For those who are not familiar with infrared, click this wiki link. It is like light, but longer wavelength and radiation we can't see with our eyes. But your camera can see it.) Anyway, so the satellite data also does contain data showing what the sky would look like with our eyes (visible spectrum), but then I would be limited to data that was taken during the local daytime of each place measured.


So now we have a database that can tell us the cloudiness of a certain region. Will be be able to do anything more with this? We'll see

Saturday, July 18, 2015

Weather Data - Part I

(This will be a very transparent post but will be useful for the next post involved in extracting this mentioned number of prob of success)

As amateur astronomers, we all share the problem of unwanted "nebulosities" in the sky, yes I'm talking about clouds. Well, actually, if you live in a truly light pollution-free environment, then maybe it's an unwanted bok globule.

Even worse, if you want to introduce and share your passion with others, you will find these others quickly dissuaded by your failed attempts to show them the night sky because a combination of these unwanted objects and Murphy's law.

This is where statistics comes in. First let's introduce the problem and see how it is related to a simple probability distribution.

Binomial Distribution
Let's say you have observed over a few years that in the month of January, it is cloudy 2/3rds of the time. If you organize an astronomical event, you have a 1/3rd (33%) chance of success. 

Rain Date
That's difficult because most likely you'll fail. How do you improve the odds? Let's say you choose a rain date. Your chance of success is now:
(chance of success 1st day)  + (chance of failure first day) *(chance of success second day) = 1/3 + 2/3*1/3=55%

You have almost doubled your chance but not quite. What about a 2nd rain date?
Chance success = 1/3 + 2/3*1/2 + 2/3^2 *1/3 = 70%. Your chances are increasing in diminishing returns.


The importance here is that by doubling your dates, you haven't doubled your chances. It's obvious, but we need to formalize it for the next step.
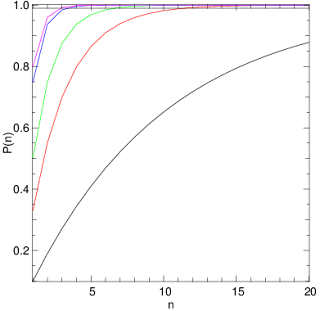
Probability of success for n-1 rain dates where perecentage success for one day is 10% (black), 33% (red), 50%(green), 75%(blue) and 80%(magenta). The horizontal black line is 99% chance of success.


So let's calculate this for multiple rain dates. The calculation is done here for n-1 rain dates above for probability of success 1/3 (red curve). The flat black line at the top of the curve is the chance of 99% success. We see that for region with 33% chance of no cloudiness, we would have to schedule 9 rain dates (total of 10 days) to beat Murphy's law with a chance of success! You see that even with 50% success you need 6 rain dates to achieve this confidence! And you can forget about it if your chance of clear skies is 10%.


What does this all mean? Basically, if you're an amateur astronomy club in a region where the chance of clear skies is 50% or lower, you'll have to think a little carefully before planning an event.

side note
I would like to note that this is an extreme simplification of the problem and that two things are important: 
1. The cloudiness on dates chosen are independent of one another. If they're dependent, this just worsens your chances. 
2. This prob of success p will probably vary month to month. The easiest simplification to this is assume the change is not large and base your calculations on the worst of the chances.

The solution
Basically, the solution to this problem (a depressing one) as an astronomy club organizer is to make sure to hold at least the number of events throughout the year that would guarantee you one event with a 99% chance of success... Holding 10 rain dates (in Montreal, where we believed the success prob to be at worst 33% for any given month) isn't really popular for any club. It's best just to hold 10 separate events throughout the year.


If you're doing this for your friends, well at least now you have a chance of warning them what they're getting into.

I'll look next at how to estimate this value of the chance of success, which I'll just call P1.

Feel free to look at code below just to see how easy Yorick is (nice alternative to matlab). However, the user base is quite small so I would recommend using python if you're just starting. (I use Python for long code I share with others, yorick when I want to quickly program something.)


Yorick code (using source code formatter): 
1:  func binom(p,n){  
2:      /* DOCUMENT Compute the binomial prob for each  
3:      *    element n with prob p  
4:      */  
5:      res=array(0., numberof(n));  
6:      for(j = 1; j <= numberof(n); j++){  
7:          for(i = 1; i<=n(j);i++){  
8:              res(j) += p*(1-p)^(i-1);  
9:          }  
10:      }  
11:      return res;  
12:  }  
13:  n = indgen(20);  
14:  window,0;fma;  
15:  plg,binom(.10,n);  
16:  plg,binom(.33,n),color="red";  
17:  plg,binom(.5,n),color="green";  
18:  plg,binom(.75,n),color="blue";  
19:  plg,binom(.8,n),color="magenta";  
20:  pldj,n(1),.99,n(0),.99;  
21:  lbl,,"n","P(n)";